
How to Clean Your Vape Tank: A Step-by-Step Guide
Cleaning your vape tank is an essential part of maintaining your vaping device. Over time, your tank can accumulate residue, bacteria, and other debris that can affect the quality of your vaping experience. Fortunately, cleaning your vape tank is a simple process that can be done with a few basic tools.
To start, you’ll need to empty your tank of any remaining e-liquid. Once your tank is empty, you can disassemble it into its various parts. Depending on your tank’s design, this may include removing the mouthpiece, unscrewing the top cap, and detaching the glass or plastic tank from the base. Be sure to keep track of all the parts so you can reassemble your tank correctly later on.
Next, you’ll want to rinse all the parts of your tank under warm water. This will remove any remaining e-liquid and debris from the tank. You can use a soft-bristled brush or a cotton swab to gently scrub away any stubborn residue. It’s important to avoid using soap or other cleaning agents, as these can leave behind unwanted residue that can affect the flavor of your e-liquid.
Understanding Your Vape Tank
Cleaning your vape tank is an essential part of maintaining your vaping device. Before you can start cleaning, it’s important to understand the different parts of your vape tank and how they work together.
The Parts of Your Vape Tank
Your vape tank is made up of several components, including:
- Drip tip: This is the mouthpiece that you inhale vapor from.
- Tank: This is the main reservoir that holds your e-liquid.
- Coil: This is the heating element that vaporizes your e-liquid.
- Wick: This is the material that absorbs and delivers e-liquid to the coil.
- Base: This is the bottom part of the tank that connects to your device’s battery.
How Your Vape Tank Works
When you take a puff from your vape, the battery heats up the coil, which in turn vaporizes the e-liquid on the wick. The vapor then travels up the tank and out of the drip tip, where you inhale it.
Your vape tank works on a simple principle of pressure and airflow. When you take a puff, you create negative pressure inside the tank, which draws e-liquid up the wick and onto the coil. As the e-liquid is vaporized, it creates positive pressure, which pushes the vapor up and out of the tank.
Different Types of Vape Tanks
There are many different types of vape tanks available on the market, each with its own unique features and benefits. Some common types of vape tanks include:
- Clearomizers: These are simple tanks that are easy to refill and maintain.
- Sub-ohm tanks: These are designed for high-powered devices and produce large clouds of vapor.
- Rebuildable atomizers (RBAs): These are tanks that allow you to build and customize your own coils and wicks.
Understanding the different types of vape tanks and their components is essential for maintaining and cleaning your device. In the next section, we’ll discuss how to properly disassemble and clean your vape tank.
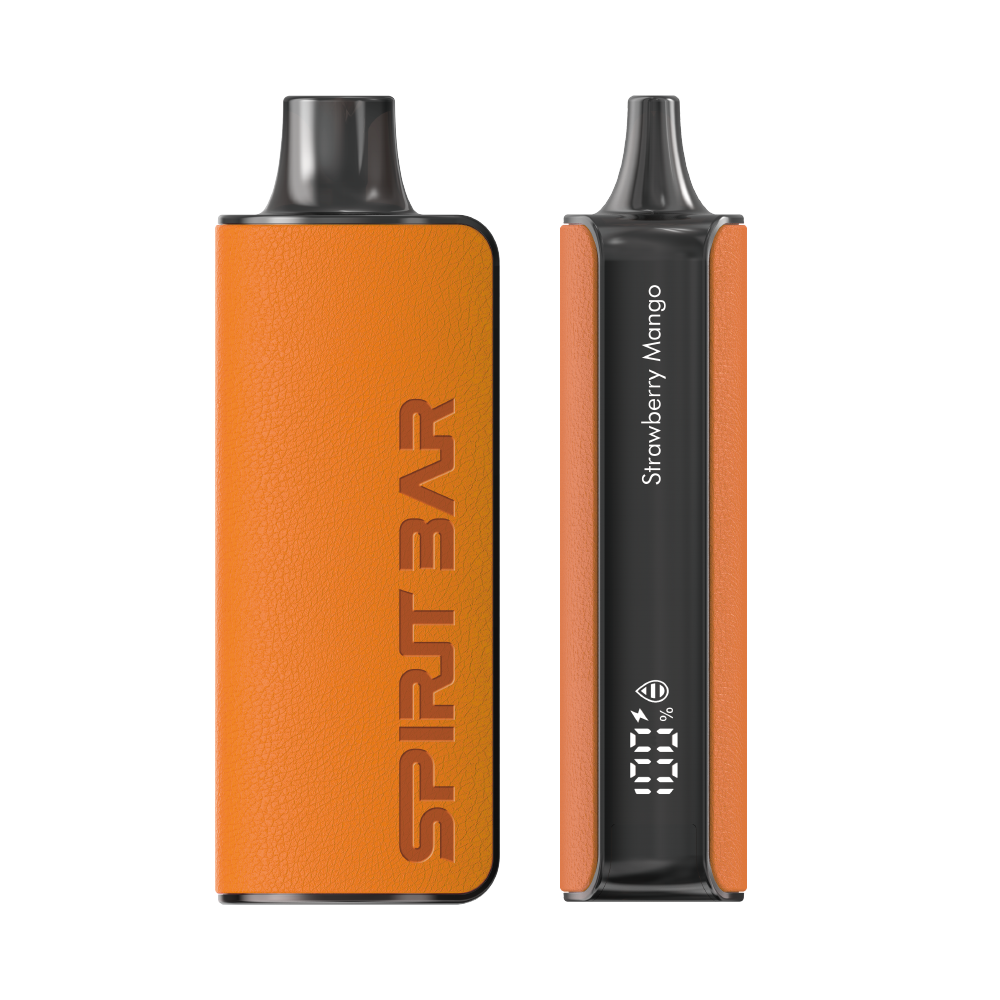
SPIRITBAR Katana BP10000
- Slender, leather-textured body reminiscent of a katana handle for an authentic samurai feel
- Unique samurai-inspired e-liquid flavor - fruity yet not too sweet, with a luxurious, elegant aroma
- Powerful 650mAh rechargeable battery for extended vaping time
- Large 18ml e-liquid capacity and 10,000 puff capacity
- Advanced mesh coil and e-liquid & power display screens for optimal vaping experience
The special juice captures the essence of the samurai spirit with its rich, smoothly pulsating flavor that brings new satisfaction with every puff. The device's slender, leather-textured design evokes the grip of a samurai's katana, making this product a perfect choice for beginner vapors.
Preparation for Cleaning
Before you start cleaning your vape tank, there are a few things you need to prepare to ensure that the process goes smoothly and effectively. Here are some tips on how to prepare for cleaning your vape tank:
Gather the necessary materials
To clean your vape tank, you will need some basic materials:
- A bowl or container to hold the disassembled tank parts
- Warm water
- Paper towels
- Q-tips or cotton swabs
- Rubbing alcohol or vodka (optional)
- A toothbrush (optional)
- A jewelry cleaning machine (optional)
Disassemble the tank
Before you start cleaning, you need to disassemble your tank. Take the tank apart, separating the parts carefully. Make sure to remember the order in which the parts were assembled so you can put them back together correctly.
Remove excess e-liquid
Once you have disassembled the tank, remove any excess e-liquid by dumping it down the sink. Rinse the tank with warm water to remove any remaining e-liquid.
Soak the parts
Fill a bowl or container with warm water and soak the tank parts for at least 30 minutes. This will help loosen any stubborn residue and make it easier to clean.
Dry the parts
After soaking, remove the parts from the water and dry them with a paper towel. Make sure to remove any excess water or condensation.
Optional: Use rubbing alcohol or vodka
If your tank is particularly dirty or has a lot of residue buildup, you can use rubbing alcohol or vodka to help clean it. Dip a Q-tip or cotton swab in rubbing alcohol or vodka and use it to clean the tank parts. You can also use a toothbrush to scrub away any stubborn residue.
Optional: Use a jewelry cleaning machine
If you have a jewelry cleaning machine, you can use it to clean your vape tank. These machines are designed to remove residue from small, fragile items and are perfect for cleaning your tank. Simply place the disassembled tank parts in the machine and let it do its job.
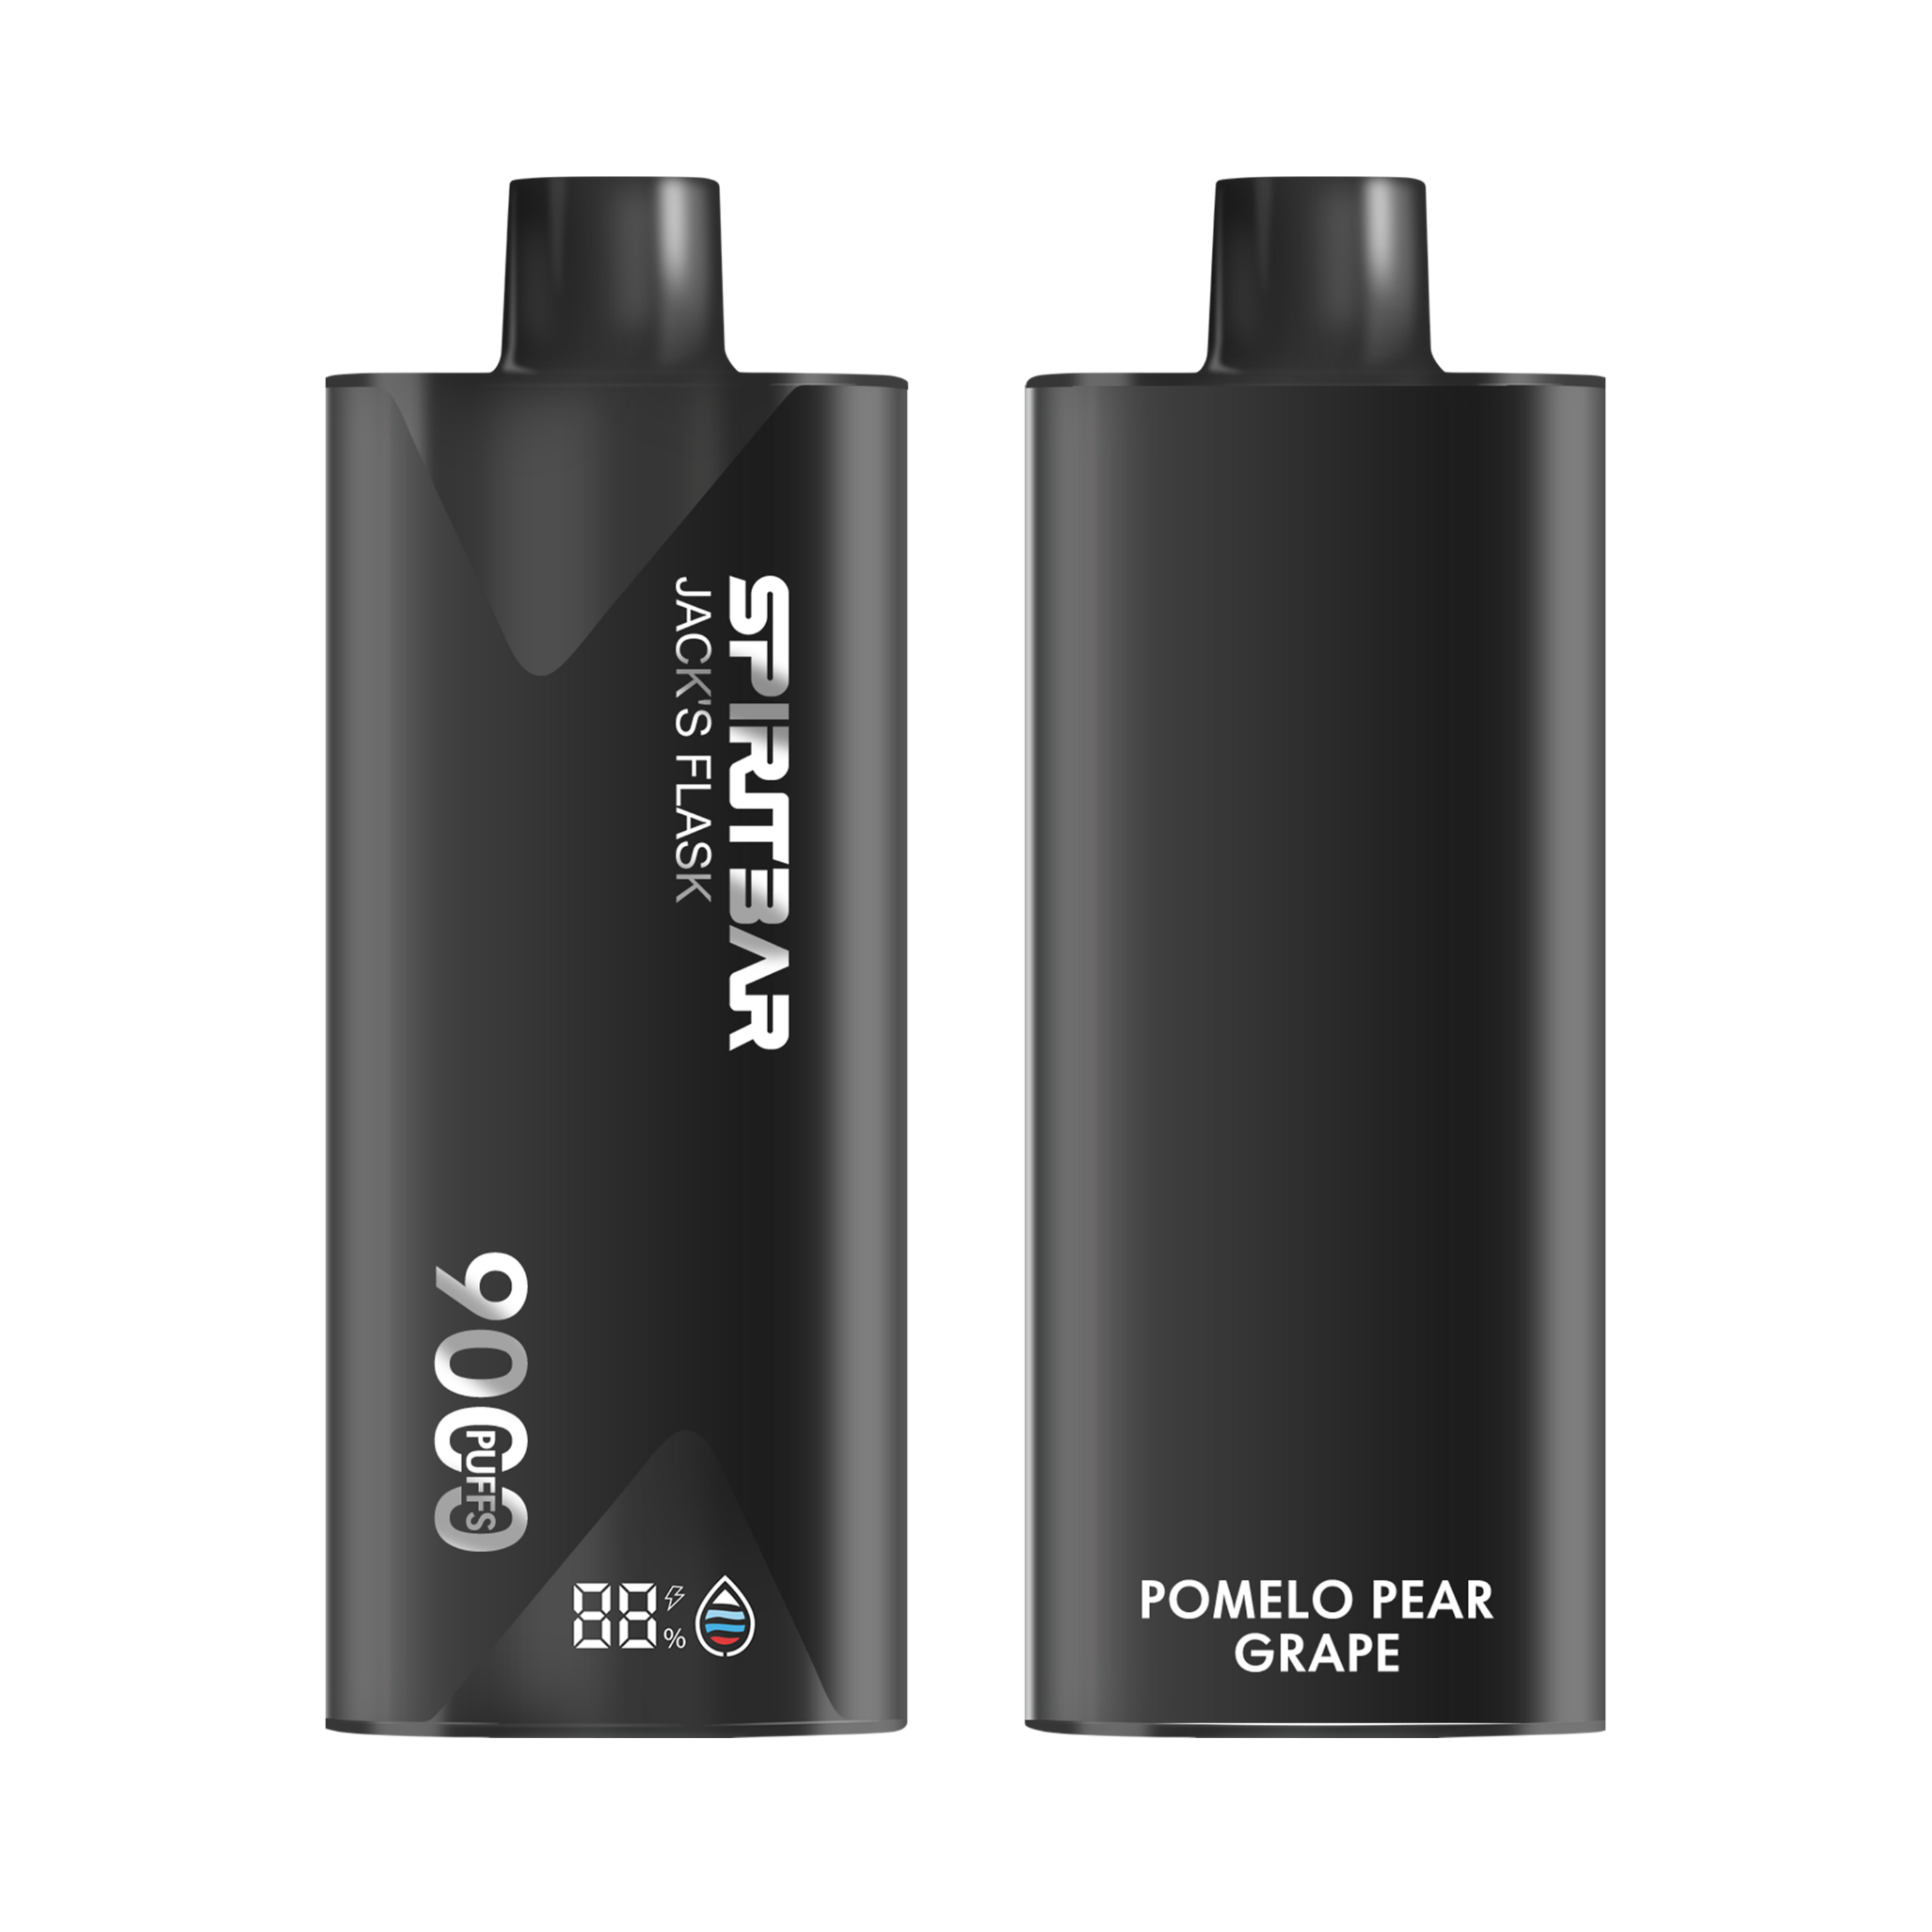
SPIRITBAR Jack’s Flask 9000 Puffs
- Stylish pirate flask-shaped body providing an exciting vaping experience
- Delivering up to 9000 puffs per device
- 20ml e-liquid capacity with 50mg nicotine strength for satisfying throat hit
- Specialized pirate-themed e-juice flavors for rich, swirling taste
- Premium mesh coil optimizes flavor profile for maximum vaping enjoyment
This disposable vape captures the daring spirit of the high seas with its flask styling and signature pirate e-juice flavors. The extraordinary battery life provides 9000 indulgent puffs for extended vaping pleasure. Live boldly and freely with the Jack's Flask - a legendary vaping experience fit for a pirate's adventures.
By following these steps, you can prepare to clean your vape tank effectively and efficiently.
Disassembling the Vape Tank
Cleaning your vape tank is an essential part of maintaining your device. Before cleaning, you need to disassemble the tank. Here’s how you can do it:
Removing the Drip Tip
The first step in disassembling your vape tank is to remove the drip tip. The drip tip is the mouthpiece that you inhale from. To remove it, simply pull it straight out of the tank.
If the drip tip is tight, you can use a pair of pliers or a cloth to get a better grip. Be careful not to damage the drip tip or the tank while removing it.
Unscrewing the Base
The next step is to unscrew the base of the tank. The base is the part that connects the tank to the mod. To unscrew it, hold the tank firmly with one hand and twist the base counterclockwise with the other hand.
Some tanks have a locking mechanism that prevents the base from unscrewing accidentally. If your tank has a locking mechanism, you need to unlock it before unscrewing the base. Refer to the user manual for instructions on how to unlock the base.
Once you have unscrewed the base, you can remove the coil and the glass tube from the tank. Be careful not to lose any small parts, such as o-rings or gaskets.
In summary, disassembling your vape tank is a simple process that involves removing the drip tip and unscrewing the base. By following these steps, you can easily clean your tank and maintain your device for optimal performance.
Cleaning Process
Cleaning your vape tank is important to maintain its performance and prevent damage. There are two main methods to clean your vape tank: rinsing with warm water and soaking in alcohol.
SPIRITBAR Katana BP10000
- Slender, leather-textured body reminiscent of a katana handle for an authentic samurai feel
- Unique samurai-inspired e-liquid flavor - fruity yet not too sweet, with a luxurious, elegant aroma
- Powerful 650mAh rechargeable battery for extended vaping time
- Large 18ml e-liquid capacity and 10,000 puff capacity
- Advanced mesh coil and e-liquid & power display screens for optimal vaping experience
The special juice captures the essence of the samurai spirit with its rich, smoothly pulsating flavor that brings new satisfaction with every puff. The device's slender, leather-textured design evokes the grip of a samurai's katana, making this product a perfect choice for beginner vapors.
Rinsing with Warm Water
The standard rinse is the easiest and most common method to clean your vape tank. If your tank is relatively clean, warm water works well. Follow these steps:
- Take the tank apart, separating the parts.
- Place each part under running water and rinse thoroughly.
- Dry the parts with a piece of paper towel.
- Let them air dry afterward until no water or condensation is visible.
Soaking in Alcohol
When gunk builds up in your tank, you may need to use high-proof, unflavored alcohol to get your vape tank clean again. Follow these steps:
- Take the tank apart, separating the parts.
- Fill a small bowl with high-proof, unflavored alcohol.
- Place each part in the bowl and let it soak for 30 minutes.
- After 30 minutes, remove the parts and rinse them under running water.
- Dry the parts with a piece of paper towel.
- Let them air dry afterward until no water or condensation is visible.
Note: Do not use soap to clean your vape tank, as it can leave residue that can affect the taste of your e-juice. Also, do not use hot water, as it can damage the o-rings and other parts of your tank.
In conclusion, cleaning your vape tank is easy and essential to keep it performing at its best. Use warm water for regular cleaning and alcohol for deep cleaning.
Reassembling the Vape Tank
Now that you have successfully cleaned your vape tank, it’s time to reassemble it. Here’s how:
-
Dry all the components: Before reassembling the vape tank, make sure that all the components are completely dry. You can use a paper towel or a cloth to dry them off.
-
Insert the coil: If you removed the coil during the cleaning process, now is the time to insert it back into the tank. Make sure that it is properly screwed in and snug.
-
Fill the tank: Once the coil is in place, you can now fill the tank with your favorite e-liquid. Be careful not to overfill it, as this can cause leaks.
-
Reattach the top and bottom: Depending on the design of your device, reattach either the top or bottom of the tank to seal it shut. Make sure that it is properly screwed in and snug.
-
Let it sit: After reassembling the tank, let it sit for a few minutes to allow the e-liquid to soak into the coil. This will help prevent dry hits and prolong the life of your coil.
-
Test it out: Finally, test out your newly cleaned and reassembled vape tank. Take a few puffs and make sure that everything is working properly. If you notice any issues, double-check that all the components are properly screwed in and snug.
By following these simple steps, you can easily clean and reassemble your vape tank, ensuring optimal performance and a great vaping experience.
Maintaining Your Vape Tank
To ensure that your vape tank is performing at its best, it’s important to maintain it properly. This means regularly cleaning it and replacing the coils when necessary. In this section, we’ll go over how to do both.
Regular Cleaning
Cleaning your vape tank regularly is essential to keep it functioning properly and to prevent any buildup of residue or bacteria. Here are the steps to follow:
SPIRITBAR Jack’s Flask 9000 Puffs
- Stylish pirate flask-shaped body providing an exciting vaping experience
- Delivering up to 9000 puffs per device
- 20ml e-liquid capacity with 50mg nicotine strength for satisfying throat hit
- Specialized pirate-themed e-juice flavors for rich, swirling taste
- Premium mesh coil optimizes flavor profile for maximum vaping enjoyment
This disposable vape captures the daring spirit of the high seas with its flask styling and signature pirate e-juice flavors. The extraordinary battery life provides 9000 indulgent puffs for extended vaping pleasure. Live boldly and freely with the Jack's Flask - a legendary vaping experience fit for a pirate's adventures.
-
Disassemble your vape tank: Take your vape tank apart and separate the parts. This will make it easier to clean each component individually.
-
Rinse with warm water: Run each part of your vape tank under warm water to remove any leftover e-liquid or residue. You can also use a small brush to scrub away any stubborn buildup.
-
Dry the parts: Use a paper towel to dry each part of your vape tank thoroughly. Make sure that there is no moisture left before reassembling your tank.
-
Reassemble your vape tank: Put your vape tank back together and refill it with your favorite e-liquid.
Replacing Coils
Coils are an essential part of your vape tank, and they need to be replaced regularly to ensure that your device is working correctly. Here’s how to replace your coils:
-
Disassemble your vape tank: Take your vape tank apart and separate the parts.
-
Remove the old coil: Unscrew the old coil from the base of your vape tank and discard it.
-
Replace with a new coil: Screw the new coil onto the base of your vape tank.
-
Reassemble your vape tank: Put your vape tank back together and refill it with your favorite e-liquid.
It’s important to note that the frequency of coil replacements will depend on how often you use your vape tank and the type of e-liquid you use. Typically, coils need to be replaced every two to four weeks. However, if you notice a burnt taste or a decrease in vapor production, it may be time to replace your coil sooner.
By following these simple steps, you can keep your vape tank in top condition and ensure that you’re getting the best possible vaping experience.
Frequently Asked Questions
How do I properly clean my Vaporesso vape tank?
To properly clean your Vaporesso vape tank, start by disassembling the tank and removing any remaining e-liquid. Rinse the tank with warm water and use a soft-bristled brush to gently scrub the tank’s interior. Dry the tank thoroughly before reassembling it.
How can I effectively clean my Geek Vape tank?
To effectively clean your Geek Vape tank, disassemble the tank and remove any leftover e-liquid. Rinse the tank with warm water and use a soft-bristled brush to scrub the tank’s interior. You can also use isopropyl alcohol to clean the tank and coil. Be sure to rinse the tank thoroughly with water and dry it completely before reassembling it.
What’s the best way to clean a vape pod?
To clean a vape pod, remove it from the device and empty any remaining e-liquid. Rinse the pod with warm water and use a soft-bristled brush to scrub the pod’s interior. Dry the pod thoroughly before reinserting it into the device.
How do I clean my vape atomizer without damaging it?
To clean your vape atomizer without damaging it, disassemble the atomizer and remove any remaining e-liquid. Rinse the atomizer with warm water and use a soft-bristled brush to gently scrub the atomizer’s interior. You can also use isopropyl alcohol to clean the atomizer, but be sure to rinse it thoroughly with water and dry it completely before reassembling it.
What’s the proper way to clean my vape tank and coil?
To properly clean your vape tank and coil, disassemble the tank and remove any remaining e-liquid. Rinse the tank and coil with warm water and use a soft-bristled brush to scrub the tank’s interior and the coil’s exterior. You can also use isopropyl alcohol to clean the tank and coil, but be sure to rinse them thoroughly with water and dry them completely before reassembling them.
What’s the best method for emptying a vape tank of juice?
The best method for emptying a vape tank of juice is to remove the tank from the device and pour the remaining e-liquid into a container. You can also use a syringe or dropper to remove the e-liquid from the tank. Be sure to dispose of the e-liquid properly according to local regulations.